Updated: 12/31/2024
Setting up an SSL certificate for XAMPP is pretty straight forward, but it won’t completely work if you are trying to use a private, local domain on your own computer. This is mostly caused by the certificates not being issues by a Certificate Authority, but rather it’s a self-signed certificate.
You can be your own Certificate Authority easy enough, but everything has to be typed correctly at the command prompt or it can fail, leaving you scratching your head. A CA cert and SSL cert process may complete, but the certificate may still not be verifiable because something was not quite right in the configuration.
Another thing that I discovered is that copying a command from the Internet may not work correctly due to some hidden chars in the string.
Once you are successful at generating a root CA cert and an SSL cert, it’s a matter of setting up the XAMPP Apache configuration. Then you will have to edit the root CA cert that CURL uses so that it can verify you SSL cert. The PHP CURL configuration needs to point to this file and if you use WordPress, this root CA cert needs to be added to the WordPress includes as well.
Let’s begin.
First install XAMPP and get it running so that you can access it’s dashboard in your browser via http.
Next, we want to add the path to OpenSSL to our path system variable so we don’t have to be in the xampp/apache/bin directory to run it. I assume you know how to add a directory to you Windows 10 system path already. If not, simply run SystemPropertiesAdvanced command, click the “Environment Variables” button and add the path to the end of the “Path” system variable (e.g. C:/xampp/apache/bin).

Rapid Environment Editor is a great tool to edit your system path with.
Note, Windows 10 comes with CURL, so if you don’t add xampp/apache/bin to your path system variable, you will be running the Windows installation of CURL and not the one included with XAMMP. Place the path to the xampp/apache/bin directory before %SystemRoot%\system32.
Next, we add a crt/dev.local directory under Apache and work inside this directory.
Run Windows cmd.exe.
Now you are going to make yourself a Certificate Authority.
C:/xammp/apache/crt/dev.local>openssl genrsa -aes128 -out EWWCA.key 2048
Generating RSA private key, 2048 bit long modulus
.................................................................+++
.....................................+++
e is 65537 (0x10001)
Enter pass phrase for EWWCA.key: [password]
Verifying - Enter pass phrase for EWWCA.key: [password]

C:/xammp/apache/crt/dev.local>openssl req -x509 -new -nodes -key EWWCA.key -sha256 -days 3650 -out EWWCA.pem
Enter pass phrase for EWWCA.key: [password]
You are about to be asked to enter information that will be incorporated into your certificate request.
What you are about to enter is what is called a Distinguished Name or a DN.
There are quite a few fields but you can leave some blank
For some fields there will be a default value, If you enter '.', the field will be left blank.
-----
Country Name (2 letter code) [AU]:US
State or Province Name (full name) [Some-State]:MO
Name (eg, city) []:Kansas City
Organization Name (eg, company) [Internet Widgits Pty Ltd]:Elastic Web Works
Organizational Unit Name (eg, section) []: Certificate Authority
Common Name (e.g. server FQDN or YOUR name) []:Elastic Web Works
Email Address []:elasticwebworks@gmail.com

C:/xammp/apache/crt/dev.local>
Now you have a CA private key and CA certificate.
Next we will use these to generate an SSL private key and cert.
C:/xamp/papache/crt/dev.local>openssl genrsa -out dev.localhost.key 2048
Generating RSA private key, 2048 bit long modulus (2 primes)
....+++++
....................................................................................................+++++
e is 65537 (0x010001)

C:/xampp/apache/crt/dev.local>openssl req -new -key dev.localhost.key -out dev.localhost.csr
You are about to be asked to enter information that will be incorporated
into your certificate request.
What you are about to enter is what is called a Distinguished Name or a DN.
There are quite a few fields but you can leave some blank
For some fields there will be a default value,
If you enter '.', the field will be left blank.
-----
Country Name (2 letter code) [AU]:US
State or Province Name (full name) [Some-State]:MO
Locality Name (eg, city) []:Kansas City
Organization Name (eg, company) [Internet Widgits Pty Ltd]:Elastic Web Works
Organizational Unit Name (eg, section) []:Developer
Common Name (e.g. server FQDN or YOUR name) []:Elastic Web Works
Email Address []:.

Please enter the following 'extra' attributes
to be sent with your certificate request
A challenge password []:.
An optional company name []:.

C:/xampp/apache/crt/dev.local>
Make a file named csr.ext with the following entries. This is important to have an “alt_name” so it will work in Chrome. Add localhost and 127.0.0.1 so it will work with those too.
authorityKeyIdentifier = keyid, issuer
basicConstraints = CA:FALSE
keyUsage = digitalSignature, nonRepudiation, keyEncipherment, dataEncipherment
subjectAltName = @alt_names

[alt_names]
DNS.1 = dev.localhost
DNS.2 = localhost
IP.1 = 127.0.0.1
The next batch of commends is a two line command made to enter after executing openssl. You will get a prompt to enter commands and you can continue on the next line with a “” at the end of each line.
C:/xampp/apache/crt/dev.local>openssl
OpenSSL> x509 -req -in dev.localhost.csr -CA EWWCA.pem -CAkey EWWCA.key -CAcreateserial
> -out dev.localhost.crt -days 2000 -sha256 -extfile csr.ext
Signature ok
subject=C = US, ST = MO, L = Kansas City, O = Elastic Web Works, OU = Developer, CN = Elastic Web Works
Getting CA Private Key
Enter pass phrase for EWWCA.key: [password]
OpenSSL>
Now you will need to tell Windows about your CA certificate.
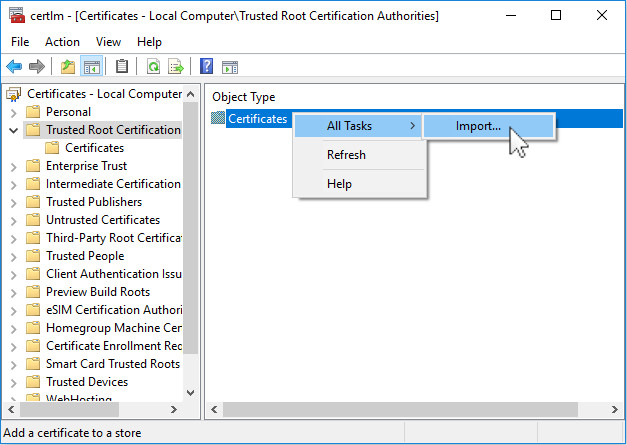
Run the Windows Cert Manager certmgr. Choose Trusted Root Certification Authorities, right click on Certificates>>All Tasks>>Import… and import your CA Certificate (EWWCA.pem).
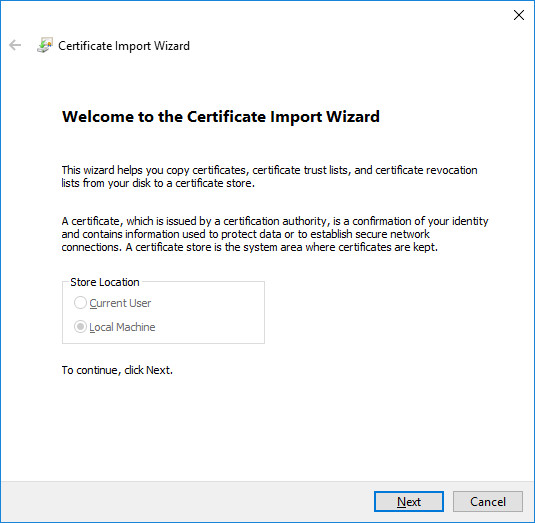
Click Next.
Choose the file. You will need to choose “All Files (*.*)” in the file chooser dialog to show your pem file or type it in directly.

Place all certificates in the following store: Trusted Root Certificate Authorities.

Click Finish.
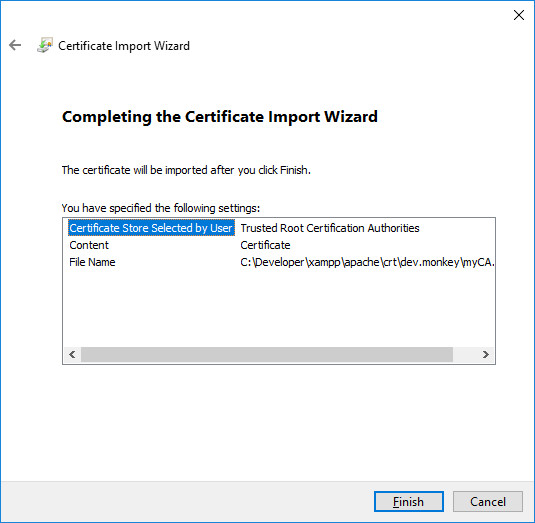
You will get a “The import was successful.” message and then you will be able to browse the root certificates and see the one you just added.

Now all you need to do is create virtual hosts in Apache and point to the new SSL Certificate and Key that you made.
Open the Apache httpd-xampp.conf file and add these entries:
## localhost
 <VirtualHost *:80>
     DocumentRoot "C:/xampp/htdocs"
     ServerName localhost
     ServerAlias dev.localhost
 </VirtualHost>
 <VirtualHost *:443>
     DocumentRoot "C:/xampp/htdocs"
     ServerName localhost
     ServerAlias dev.localhost
     SSLEngine on
     SSLCertificateFile "C:\xampp\apache\crt\dev.local\dev.localhost.crt"
     SSLCertificateKeyFile "C:\xampp\apache\crt\dev.local\dev.localhost.key"
 </VirtualHost>
Note: Apache will work both for localhost and dev.localhost if you have this entry in your HOSTS file:
127.0.0.1 localhost dev.localhostNow, https should work in Chrome and Edge, but not in Firefox. If it doesn’t work, restart your browser or restart your computer.
You will need to import your CA certificate directly into Firefox’s CA store.
Run Firefox and go to Options>>Privacy & Security>>Security Devices and click on the “View Certificates…” button. On the next dialog box, click on the Authorities tab and click the “Import…” button.
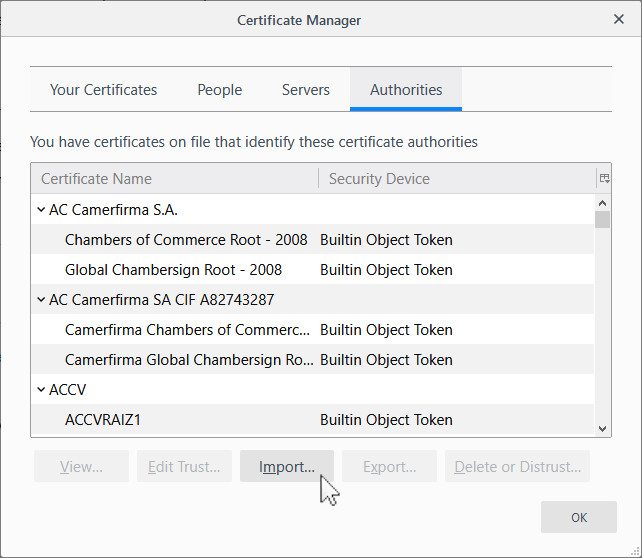
On the next dialog box, check the 2 boxes and click OK.

Now https should work in Firefox. If not, restart Firefox or restart the computer.
Now check your PHP.ini file and enable extension=curl and point curl.cainfo and openssl.cafile both to C:\xampp\apache\bin\curl-ca-bundle.crt. CURL will work for PHP scripts now, unless the script uses it’s own CA bundle file. (See below how to enable your CA cert in WordPress.)
At this point, CURL included with XAMPP will work if you access https sites on the Internet, but it will fail if you access a site on dev.localhost because CURL uses curl-ca-bundle.crt file for it’s CA certs. Your new CA cert is not in this file, so you will need to open up curl-ca-bundle.crt and your pem file (EWWCA.pem) in a text editor.
Copy everything in the pem file.

Open up the curl-ca-bundle.csr file located in xampp/apache/bin and scroll down to the very bottom of the file and paste in your CA cert. Ensure there are no spaces or new lines at the end. As shown in the screenshot above, you can also add a title to the cert so you know what it is.
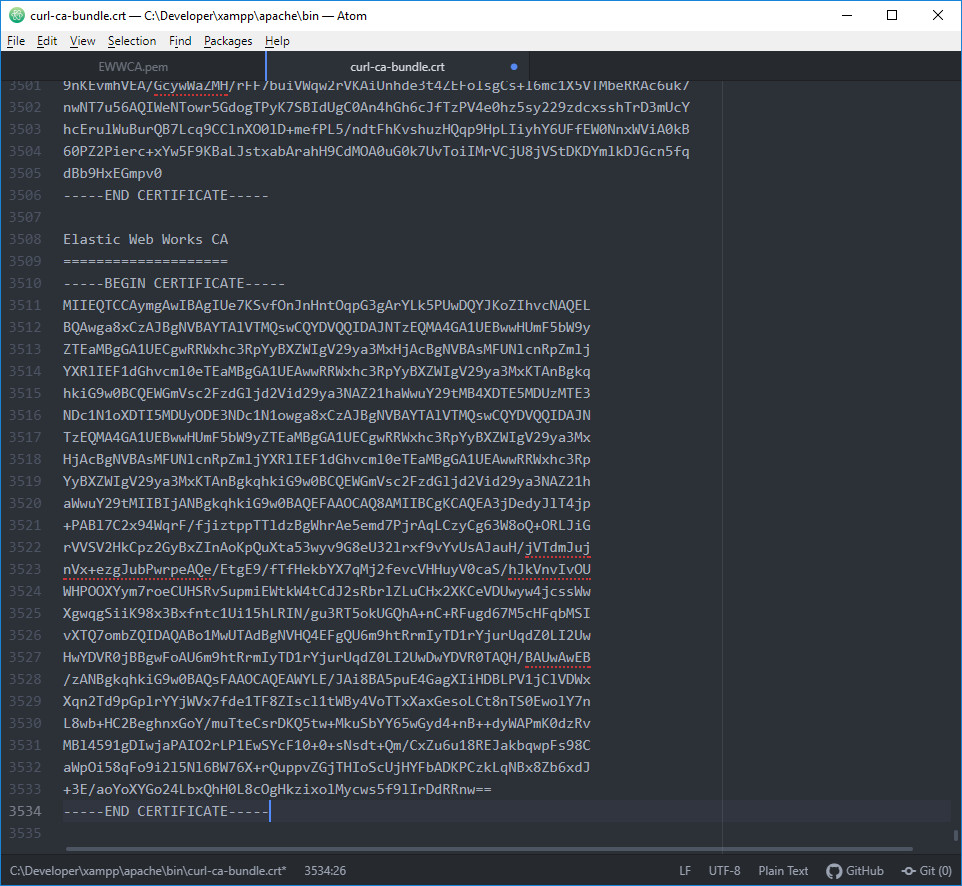
Save the file and now CURL will work https on dev.localhost from the command line (cmd.exe).
To enable CURL to work in WordPress after you have added your CA cert to it, as per the previous instructions, copy the curl-ca-bundle.csr file to the /wp-includes/certificates folder. Then rename ca-bundle.csr to ca-bundle.old and change curl-ca-bundle.csr filename to ca-bundle.scr.
CURL should now work with any WordPress plugins that access https://dev.localhost URLs.
Warning: If you update WordPress, it will overwrite your custom ca-bundle.scr file.

